5 Laws Everybody In Gutter Downpipe Repair Should Know


Gutter Downpipe Repair
Gutter downpipes are a crucial component of any gutter system, effectively transporting water from the guttering to the ground. They can protect a structure from water damage, but require regular maintenance and cleaning.
If a downpipe gets damaged, it is important to carry out repair work promptly by a roof plumber. Here are some guidelines to help you with your gutter downpipe repair:
Remove the old Downspout
Gutter downpipes play an essential role in directing rainwater away from the foundation of your home, thereby protecting it from deterioration and preventing water damage. Sometimes, they can become blocked or damaged, causing water build up at the base or cause leaks.
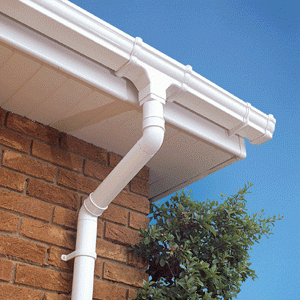
Gutter downspouts have a curved shape at the top and bottom, to better collect and disperse rainwater. They also have a hole that connects to your gutter system. These holes are normally sealed shut to prevent leaks and a buildup of debris that can prevent rainwater from getting through the downpipe.
The downpipes are attached to the guttering system with hangers, usually screws that anchor them to the wall of your house or building. You can remove the screws, but be cautious to not to pull the downpipes out of the guttering systems. This could cause further damage.
Once the downpipe has been removed from the guttering you can take it off and place it aside to be cleaned or removed. You may need to replace your downpipes if they're worn out or damaged. You can choose from a variety of sizes, materials and finishes for your gutter system. Selecting the proper size for your downpipe is crucial because it ensures that your gutter system is able to properly handle rainfall volumes without clogging or overflowing.
Utilizing gutter extensions is another option to improve your downpipe's performance. This is an easy DIY project that will prevent water from pooling close to the base of your home and also protect your home from water damage.
Downpipe bends are often used to create an "swan neck" shape for your downpipe, directing water flow and stopping it from draining close to the house. These can be made from metal or plastic and you must ensure that they're sized appropriately for your guttering system as well as the weather conditions.
The internal stopend is set just after the outlet of a downpipe in order to prevent the guttering from bursting at the end. This is a good opportunity to determine if the inner stopend is blocked by dirt or other debris.
Clean the Downspout
The downspout is a vital component of your gutter system, therefore it must be in working condition in order to allow water to flow smoothly. If your downspout is blocked it is likely to result in your gutters overflowing. A small amount of overflow isn't a big deal however, a totally blocked downspout is a bad sign.
You'll have to climb your ladder if your downspout has become blocked. Before doing this, however, you will need to ensure that your ladder is set securely. Request your helper to hold the ladder as you climb it and have them hand you a garden hose (preferably one that has good pressure). Place the hose's end pipe into the opening of the downspout, and turn it on. The water flow should force out the obstruction. If it doesn't work, you may have to increase the pressure of water a bit or try another technique.
You'll need to employ an air blower or wet-dry vac to blast out the accumulated debris in the downspout. You can also make use of a drain auger to remove the obstruction if you have one in your garage. If that still isn't working, try sending a stronger stream of water down the downspout with the power washer.
You may also try to remove the blockage by hand if the clog isn't too serious. Start from the top of the downspout and proceed to the bottom. While doing this, keep in mind that the downspout of your gutter is likely to be full of debris from years of decaying leaves and other debris Don't be shocked to be surrounded by a shower of muck while trying to dislodge it. Once the clog has been removed, your downspout will be clean and water should flow freely from it at ground level. If not, you'll need to clean it again before your gutter system drains properly. It is recommended to do this regularly to prevent clogs.
Replace the Downspout
The downspout is a pipe that carries rainwater out of gutters to the earth. Downspouts could empty into a garden feature or rain barrel. They may also be emptied into a drain pipe underground that connects to a storm drainage system or septic tanks. No matter where they empty into, they must divert the water away from your home to prevent foundation or basement damage and rotting.
Gutter downpipes are available in a vast variety of sizes and materials. They are designed according to the roof size as well as the length of the gutter and the local climate conditions. Downpipes should be regularly checked and cleared to prevent debris clogs. Examine for cracks and broken sections in the downpipes. These are signs of serious problems that require professional attention.
A clogged drainpipe can cause the gutters to sag or even collapse. To clean your gutter, you can climb a ladder to get to the top. Be cautious and ensure that you employ a person to hold it securely. If you see an obstruction, clean it using a hose to ensure the downspout can drain. If it's completely blocked it is necessary to remove and replace the downspout.
Drop outlets (also called downspout outlets) are used to connect gutters with downspouts. The outlet is a tiny attachment that enables the downspout outlet to extend beyond the gutter. If littlehampton Guttering Specialist does not have a downspout outlet installed, drill a hole in it. Then, you can coat the lip of a new downspout outlet with gutter sealant, and place it in the hole you created in the gutter.
Use sheet metal screws to attach the downspout. Nails are not recommended. Install brackets compatible with your guttering system. For example metal gutters have straps that secure downpipes to the wall, while vinyl gutters have metal downspout brackets that connect onto the sides of the gutters.
Begin with a small section of gutter that connects to the downspout. It should be the same length as the elbow that's attached to the downspout. Each elbow and downspout has a section on one end that is "crimped" or squeezed. Utilize a gutter crimper make the edges crimped so that it is flush with the other elbow.
Repair the Downspout
The downpipes of gutters are exposed to elements and eventually wear out. This is especially the case where they join with other gutter components. The joints can become loose or come apart which could allow dirt to get into the seals, causing leaks. With the right tools and experience, this problem is easy to solve. Regularly inspecting your guttering and downpipes can help avoid problems such as clogging, standing water and leaks.
The downpipe is the last stage of a guttering installation which diverts rainwater into an outlet or soak well, or any other drainage system to prevent flooding. Connect your downpipe with your soak-well and stormwater system to ensure that stormwater doesn't flow into other areas of your yard or home.
If your downpipe is leaking, it's likely that the end cap has either fallen off or has worn away. Gutter sealant is a good option to stop this issue and should be applied to the inside of the downpipe, where it joins the gutter, and then pressed into place using your finger while wearing latex gloves.
Another reason why downpipes leak is when the gutter is not properly pitched. The gutter might require removal, the downpipe re-pitched and then the gutter re-mounted. This is easy enough using a ladder, however, remember to exercise extreme caution when working at heights and have someone hold the ladder's bottom.
Other parts of the guttering could also leak, for example the elbows or end caps. If this is the case, a small hole can be repaired with gutter sealant which can be tapped into the joint and pressed into place using your fingers while wearing latex gloves.
Rust or paint rub off could cause leaks around joints of a downpipe. This can be rectified by scraping off the old paint or rust and applying gutter sealant to the area that must be sealed. It is important that the gutter sealant dries completely and isn't affected by other materials, like dirt or dust.